Simple Arduino LED Blinking Project for Beginners
Project Overview
One of the first and most classic Arduino projects is the blinking LED. It’s perfect for beginners to understand the basics of Arduino programming and electronics. This project demonstrates how to turn an LED on and off at regular intervals.
Components Required
| Component | Quantity |
|---|---|
| Arduino Uno/Nano | 1 |
| LED (any color) | 1 |
| 220Ω Resistor | 1 |
| Breadboard | 1 |
| Jumper wires | 3-4 |
| USB cable | 1 |
Wiring Diagram
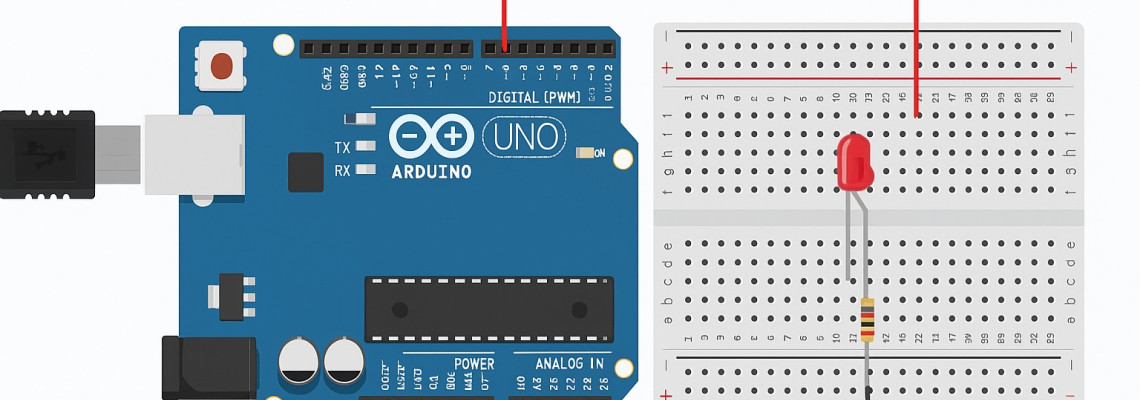
Here’s how to connect your components:
Wiring Diagram Image
This is a standard wiring diagram for an LED connected to Arduino digital pin 13.
Arduino Code
How It Works
-
pinMode(13, OUTPUT);tells the Arduino that pin 13 will be used to send output. -
digitalWrite(13, HIGH);turns the pin on (5V), lighting the LED. -
delay(1000);pauses the program for 1000 milliseconds (1 second). -
Then the pin is turned off with
LOW, and the delay repeats the cycle.
What You Learn
-
Basic circuit wiring
-
Using a breadboard and jumper wires
-
Uploading code to the Arduino
-
How to use
setup()andloop()functions in Arduino
Next Steps
After completing this project, try:
-
Changing the blink speed
-
Adding multiple LEDs
-
Using different digital pins


-250x250w.jpg)


Leave a Comment